고정 헤더 영역
상세 컨텐츠
본문
Quill?
Quill은 최신 웹을 위해 만들어진 무료 오픈 소스 WYSIWYG 편집기로
모듈식 아키텍처와 표현식 API를 통해 필요에 따라 완벽하게 사용자 정의할 수 있다.
여러 편집기들이 있고 그 중 가장 대표적인 것이 Facebook이 지원하는 Draft.js일 것이다.
기본적인 요구 사항에 맞는 텍스트 편집기를 구현하려는 경우 Draft가 많이 쓰이긴 하지만
자체 버그도 있고 결정적으로 진행하고 있는 프로젝트와 CSS가 충돌 이슈가 있어 Quill로 적용하게 되었다.
Quill 장점
- API 기반 디자인 덕분에 다른 텍스트 편집기 에서처럼 HTML이나 다른 DOM 트리를 구문 분석 할 필요가 없다.
- 편집기 스타일링을위한 사전 설정으로 사용자 정의 콘텐츠 및 서식 지원.
- 크로스 플랫폼 및 브라우저 지원.
- 쉬운 설정.
- 크로스 플랫폼 및 크로스 브라우저 지원을 제공
Quill의 단점
- 가능한 XSS 보안 취약성.
- 기능 사용자 정의가 제한
- 업데이트 및 패치 감소.
이렇게 장점과 단점이 존재한다. 나는 기본적인 기능만 있으면 충분했고, 막상 적용해보니 쉽고 용이하여 큰 단점은 못느꼈다.
공식 사이트 : https://quilljs.com/
Quill - Your powerful rich text editor
Sailec Light Sofia Pro Slabo 27px Roboto Slab Inconsolata Ubuntu Mono Quill Rich Text Editor Quill is a free, open source WYSIWYG editor built for the modern web. With its modular architecture and expressive API, it is completely customizable to fit any ne
quilljs.com
npm 설치 : https://www.npmjs.com/package/react-quill
react-quill
The Quill rich-text editor as a React component.
www.npmjs.com
적용 환경
Spring boot, React, TypeScirpt
적용 순서
1. 설치
npm install react-quill
2. index.html에 스타일시트 추가
<link rel="stylesheet" type="text/css" href="lib/css/normalize.css">
3. 컴포넌트 생성 (component/Quill/QuillEditor)
// import quill & css
import ReactQuill from 'react-quill';
import 'react-quill/dist/quill.snow.css';

// props 타입정의
type QuillEditorProps = {
    quillRef : string;
    htmlContent : string;
    setHtmlContent: string;
}

const QuillEditor = memo(({ quillRef, htmlContent, setHtmlContent }: QuillEditorProps) => {

    const modules = useMemo(
        () => ({
            toolbar: { // 툴바에 넣을 기능
                container: [
                    ["bold", "italic", "underline", "strike", "blockquote"],
                    [{ size: ["small", false, "large", "huge"] }, { color: [] }],
                    [
                        { list: "ordered" },
                        { list: "bullet" },
                        { indent: "-1" },
                        { indent: "+1" },
                        { align: [] },
                    ],
                ],
            },
        }), []);
    return (
        <>
            <ReactQuill
                // ref={quillRef}
                ref={(element) => {
                    if (element !== null) {
                        quillRef.current = element;
                    }
                  }}
                value={htmlContent}
                onChange={setHtmlContent}
                modules={modules}
                theme="snow"
                style={{height: '85%', marginBottom: '6%'}} // style
            />
        </>
    )
})

export default QuillEditor
4. 게시글 Create (noticeCreateDialog)
import React, { useEffect, useRef, useState, memo } from 'react'
...
import QuillEditors from '../../components/quill/QuillEditor'; //Quill

type NoticeCreateDialoProps = {
    open: boolean;
    onClose: () => void;
};

const NoticeCreateDialog = memo(({
    open,
    onClose
}:NoticeCreateDialoProps) => {
	...
    const quillRef = useRef(); //🌈
    const [htmlContent, setHtmlContent] = useState(""); //🌈
    const [noticeTitle, setNoticeTitle] = useState<string>('');
    const [cont, setCont] = useState<string>('');

    const form = new FormData();

    const handleClose = () => {
        onClose && onClose();
        setHtmlContent('');
    }; // 다이얼로그 닫힐 때 에디터 초기화


	// 공지사항 등록 handler
    const handleCreateAlert = () => {
        // const description  =  QuillRef.current?.getEditor().getText();
        //태그를 제외한 순수 text 추출.
        // 검색기능을 구현하지 않을 거라면 굳이 text만 따로 저장할 필요는 없다.
        // if (description.trim()==="") {
        //     alert("내용을 입력해주세요.")
        //     return;
        // }

        swalConfirm("등록하시겠습니까??").then(function(res) {
            if (res.isConfirmed) {
               form.append('title', noticeTitle);
               form.append('cont', htmlContent);
             	// 서버로 form 전송
                registerNotice(form).then(function(res) {
                    swal(res.message).then(function(res) {
                        handleClose();
                        callGetNoticeList();
                    });
                });
            }
        });
    }

    const onChangeTitle = (event: any) => {
        setNoticeTitle(event.target.value);
    };

    // 첨부파일
    const addFile = (event: any): void => {
        event.preventDefault();
        for(let key of Object.keys(event.target.files)) {
            if (key !== 'length') {
              form.append('file', event.target.files[key]);
            }
          }
    }

    return (
        <CDialog
            id="myDialog"
            open={open}
            maxWidth="md"
            title={`공지사항 등록하기`}
            onClose={handleClose}
            onCreate={handleCreateAlert}
            modules={['create']}
        >
            <table className="tb_data tb_write">
                <tbody>
                <tr>
                    <th>제목</th>
                    <td colSpan={3}>
                        <CTextField
                            id="dataset-title"
                            type="text"
                            placeholder="제목을 입력하세요."
                            className="form_fullWidth"
                            value={noticeTitle}
                            onChange={onChangeTitle}
                        />
                    </td>
                </tr>
                <tr>
                    <th>상세내용</th>
                    <td colSpan={3} style={{height:'300px'}}>
                          <QuillEditors quillRef={quillRef} htmlContent={htmlContent} setHtmlContent={setHtmlContent} />
                    </td>
                </tr>
                <tr>
                    <th>첨부파일</th>
                    <td colSpan={3}>
                        <input type='file' id='fileUpload' onChange={addFile}/>
                    </td>
                </tr>
                </tbody>
            </table>
        </CDialog>
    );
})


export default NoticeCreateDialog;

편집기로 내용을 작성하면 이렇게 html 형식으로 담겨진다.

5. 게시글 Read (NoticeDetails)
<tr>
<th>내용</th>
<td><pre dangerouslySetInnerHTML={{__html:detail.cont}}/></td>
</tr>
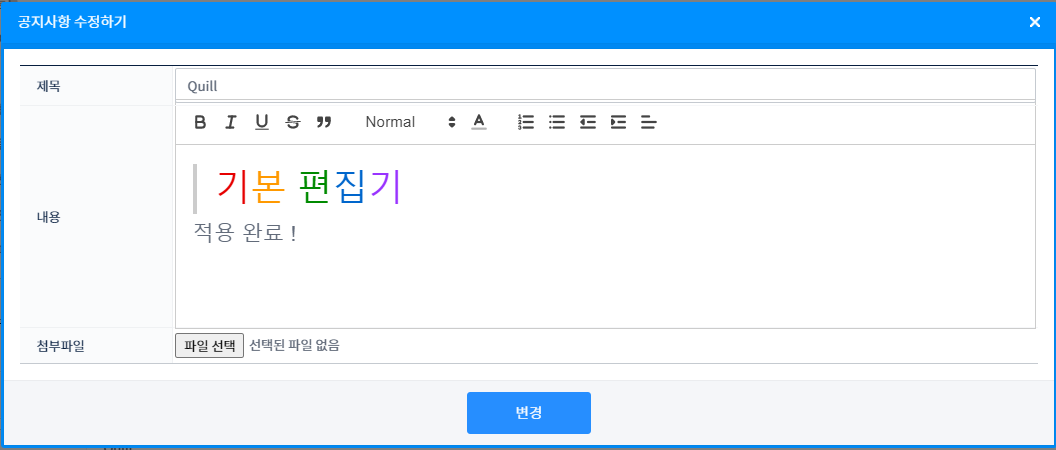
4. 게시글 Update (NoticeDetailsDialog)
// quill 컴포넌트 import
import QuillEditors from '../../components/quill/QuillEditor';

const NoticeEditDialog = memo(({open,detail,onClose,hostUrl}:NoticeEditDialogProps) => {
    const [ editTitle, setEditTitle] = useState(detail.title);
    const [ editCont, setEditCont] = useState(detail.cont);

    const quillRef = useRef();
    const [htmlContent, setHtmlContent] = useState("");

    //수정할 게시글 불러오기
    useEffect(() => {
    setEditTitle(detail.title);
    setHtmlContent(detail.cont);
    }, [open]);

    // 수정 handler
    const handleUpdateAlert = () => {
      swalConfirm("수정하시겠습니까??").then(function(res) {
        if (res.isConfirmed) {
          form.append('cseq', detail.cseq);
          form.append('title', editTitle);
          form.append('cont', htmlContent);
          form.append('file_del', JSON.stringify(delFile));
            modifyNotice(form).then(function(res) {
            swal(res.message).then(function(res) {
            handleClose();
            callGetNoticeList();
            callGetNoticeDetail(detail.cseq);
          });
        });}
      });
    }

    return (
    ...
               <tr>
                 <th>내용</th>
                    <td colSpan={3}>
                          <QuillEditors quillRef={quillRef} htmlContent={htmlContent} setHtmlContent={setHtmlContent}/>
                    </td>
                </tr>
    );
})


댓글 영역